
HTML Forms and Controls
<form> contract — where data goes, how it travels, and the controls that carry it.
HTML forms are older than CSS layout and more standardized than any framework's widgets: every control here works with the keyboard, with a screen reader, and on every phone's native keyboard — for free. Your job is mostly to use them correctly rather than rebuild them.
The form element
The contract: action and method
<form> wraps the controls and states its contract: action is the URL that receives the data, method is how it travels. GET puts the values in the URL — visible, cacheable, right for searches; POST puts them in the request body — required for anything that creates, changes, or deletes data:
<!-- a search: GET, because the result page should be shareable -->
<form action="/search" method="get">
  <label for="q">Search</label>
  <input id="q" name="q" type="search">
  <button type="submit">Go</button>
</form>

<!-- a signup: POST, because it creates an account -->
<form action="/signup" method="post">...</form>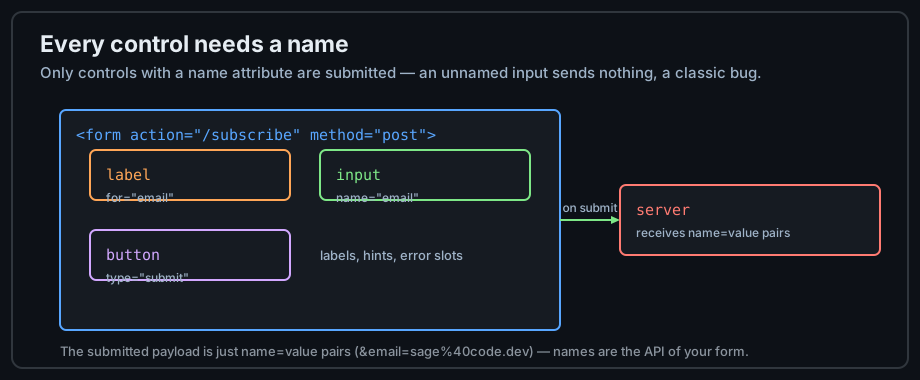
Figure 1 — A form is a contract between the page and the server.
The name attribute is everything
On submit, the browser sends name=value pairs — and only for controls that have a name. An input without name silently submits nothing, the single most common form bug:
<input id="email" type="email">             <!-- submitted? NO -->
<input id="email" name="email" type="email"> <!-- submitted: email=... -->
enctype and file uploads
The default encoding is application/x-www-form-urlencoded, fine for text. File uploads require method="post" plus enctype="multipart/form-data" — without it, the browser sends only the file's name, not its contents:
<form action="/upload" method="post" enctype="multipart/form-data">
  <label for="doc">Document</label>
  <input id="doc" name="doc" type="file">
  <button type="submit">Upload</button>
</form>
Labels and grouping
Explicit labels: for + id
Every control needs an accessible name, and the <label> is how real pages provide it. The for attribute must match the control's id exactly. Clicking the label then focuses the control — a large, honest click target on mobile too:
<label for="email">Email address</label>
<input id="email" name="email" type="email">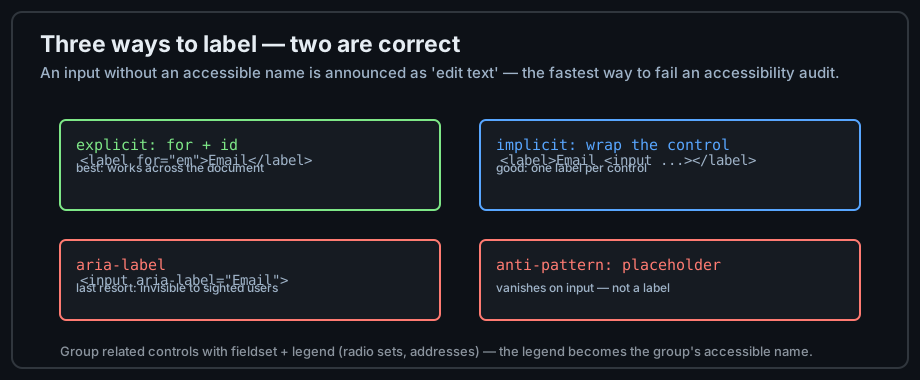
Figure 2 — Three ways to label; placeholder is not one of them.
Implicit labels: wrapping
Wrapping the control inside the label associates them implicitly — useful for checkbox and radio rows where the label is the whole row:
<label>
  <input type="checkbox" name="news"> Send me the newsletter
</label>
fieldset and legend
Related controls group into a <fieldset> with a <legend>. The legend becomes the group's accessible name — radio groups without it announce every option with no context:
<fieldset>
  <legend>Contact preferences</legend>
  <label><input type="checkbox" name="news"> Email updates</label>
  <label><input type="checkbox" name="sms"> SMS alerts</label>
</fieldset>
Input types
Text and its variants
type="text" accepts anything; its siblings constrain and equip it: email brings an @-keyboard on phones plus format validation, url expects a URL, tel gets a phone keyboard without format enforcement (phone formats vary too much), search gains native clear affordances. Choose the most specific type — they are semantics, not skin:
<input name="handle" type="text">
<input name="email" type="email">   <!-- @ keyboard on mobile -->
<input name="site" type="url">
Numbers, dates, and ranges
number constrains input to numbers with min, max, step; range renders a slider over the same contract; date, time, and month open the browser's native picker — locale-aware and keyboard accessible:
<input name="guests" type="number" min="1" max="8" step="1">
<input name="volume" type="range" min="0" max="100">
<input name="arrival" type="date" min="2026-10-01">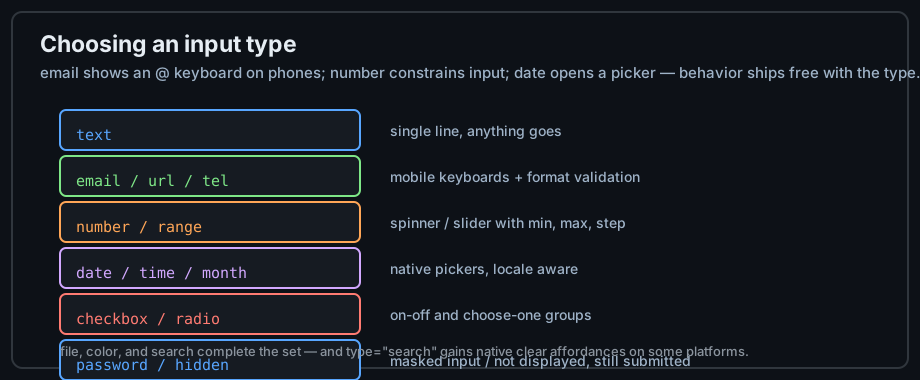
Figure 3 — Input types bring keyboards, validation, and pickers.
Checkboxes and radios
Checkboxes toggle independent options; radios choose one of a group — identified by sharing the same name. Radio groups need a fieldset/legend, and each option needs its own label:
<fieldset>
  <legend>Size</legend>
  <label><input type="radio" name="size" value="s"> Small</label>
  <label><input type="radio" name="size" value="m" checked> Medium</label>
  <label><input type="radio" name="size" value="l"> Large</label>
</fieldset>   <!-- same name = one choice -->
Choices and text areas
select and optgroup
<select> presents a compact choice list; <optgroup> labels its sections. Options carry a value (what's submitted) and visible text (what's shown) — they differ more often than beginners expect:
<label for="planet">Planet</label>
<select id="planet" name="planet">
  <optgroup label="Inner planets">
    <option value="mercury">Mercury</option>
    <option value="venus" selected>Venus</option>
  </optgroup>
  <optgroup label="Outer planets">
    <option value="mars">Mars</option>
  </optgroup>
</select>
datalist: a text input with suggestions
<datalist> attaches suggestion options to a free-text input — the user can type anything, but gets completions. It is not a select: the value is not constrained:
<label for="editor">Favorite editor</label>
<input id="editor" name="editor" list="editors">
<datalist id="editors">
  <option value="VS Code">
  <option value="Zed">
  <option value="Neovim">
</datalist>
textarea and buttons
<textarea> takes multi-line text (rows suggests a height; CSS may override it). Buttons have three types: submit (the default — beware inside any form), reset (rarely wanted), and button (inert, for JavaScript). A button outside a form does nothing; inside, an unlabeled <button> submits:
<label for="msg">Message</label>
<textarea id="msg" name="msg" rows="5"></textarea>
<button type="submit">Send message</button>
<button type="reset">Clear</button>
A complete form
The markup
Putting it together — labels, types, grouping, and a submit:
<form action="/contact" method="post">
  <label for="full_name">Full name</label>
  <input id="full_name" name="full_name" type="text" autocomplete="name" required>

  <label for="user_email">Email</label>
  <input id="user_email" name="user_email" type="email" autocomplete="email" required>

  <label for="message">Message</label>
  <textarea id="message" name="message" rows="5" required></textarea>

  <button type="submit">Send message</button>
</form>
autocomplete helps people and browsers
The autocomplete attribute tells browsers (and password managers) what each field is: name, email, tel, street-address, new-password. Filling forms is faster, and it is a WCAG expectation for identity and payment fields.
Hidden fields and state
type="hidden" carries values the user doesn't see — anti-forgery tokens, workflow step. It is still submitted, still spoofable, and chapter 15 shows why the server must never trust it for authorization.
Common mistakes
Missing name attribute
Worth repeating because it costs real debugging hours: a control without name is not submitted. The form "works" — nothing arrives. Verify with DevTools' Network tab: watch the request payload and check each field is there.
Placeholder as label
placeholder disappears on input, is often skipped by screen readers, and fails contrast checks. It is a hint ("john@example.com"), never a label. If you remove the visible label because the placeholder "shows what it is", you have deleted the accessible name.
Nested forms
Forms cannot contain other forms — the parser drops the inner tag and your button mysteriously submits the wrong thing. Use the form attribute to associate an outside control with a form instead.
Trusting the browser alone
Client-side validation is a courtesy; anyone can bypass it with curl or DevTools. The server must re-validate everything — chapter 8 details the pipeline and chapter 15 the security reasoning.
Practice
Exercises
- Build the contact form above, submit it to a non-existent URL, and inspect the request in the Network tab — find your
name=valuepairs. - Add a radio group with fieldset/legend, then tab through it: arrow keys move within the group, Tab moves past it.
- Give every field a correct
autocompletevalue and let the browser fill it. - Break the form on purpose: remove a
name, remove afor— then catch both in the accessibility pane.
Demo lab
07_contact_form.html in the Lab Examples page is the complete contact form — view the source, then preview it and submit it to see the flow.