
Errors, defer & or_return
if count, ok := stock[…]; ok was an error check. This lesson makes that pattern explicit, shows the richer form the standard library uses, and covers the two pieces of Odin that make error handling tolerable in practice: or_return and defer.
There is one idea underneath all of it, and it is the same idea as the very first page of this track: failure is a value. Nothing throws, nothing unwinds your stack behind your back, and a procedure that can fail says so in its signature.
Errors Are Values
Start with what that costs and what it buys, because the trade is the whole design.
No Exceptions, Again
In a language with exceptions, any call on any line might jump somewhere else entirely, and you cannot tell which by reading the code. In Odin that possibility does not exist: a procedure returns, and what it returns is everything you need to know about how it went.
The cost is visible lines of checking. The benefit is that a function's control flow is exactly what you read — which is why Odin spends the rest of this lesson making those lines as cheap as it can.
Two Shapes of Failure
Odin code uses two shapes, and choosing between them is a small design decision you will make over and over:
| Shape | Signature | Use it when |
|---|---|---|
| The simple shape | (value, ok: bool) | There is one way to fail, or the caller does not care which way it was |
| The rich shape | (value, err: Error) | Several failures are possible and a caller might handle them differently |
Both put the answer in the results, where it cannot be missed. The difference is only how much you say about what went wrong.
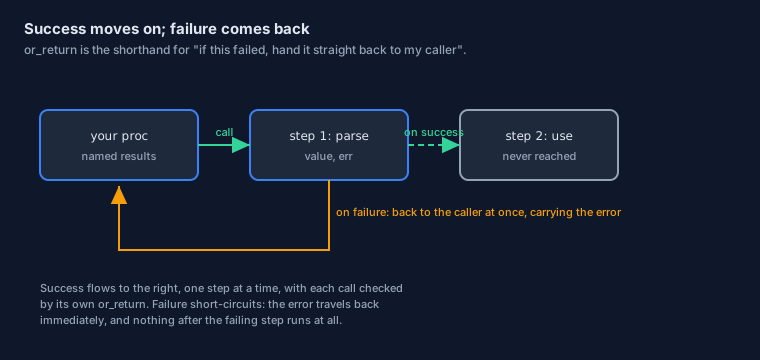
or_return is the shorthand for "if this failed, hand it straight back to whoever called me".The Simple Shape: a Bool
Most failures a beginner meets are of one kind only: the thing did not work. For those, one extra boolean is enough.
"And Whether It Worked"
// The second result answers one question: did it work?
parse_age :: proc(text: string) -> (age: int, ok: bool) {
    if len(text) == 0 {
        return 0, false          // refuse, and say so
    }
    // (a real parser would live here)
    return 42, true
}

main :: proc() {
    age, ok := parse_age("42")

    if !ok {
        fmt.eprintln("that is not an age")
        return
    }
    fmt.println("age:", age)     // 42
}
Notice that the result type does not hint at failure — nothing in int or bool says "these belong together". What makes the pattern work is that age alone is meaningless without ok, and the language gives you both in one statement.
If you have followed this track, you have written this shape four times already: in the if initialiser, in procedure results, in map lookups, and in union assertions. That repetition is not a coincidence — it is the house style, and once you notice it you will see it everywhere in the standard library.
or_else — A Fallback in One Line
Sometimes you do not care whether it worked; you just want a usable value. or_else says that in the call itself. Here it is on a map lookup and on a type assertion, both taken from Odin's own demo file:
// The fallback replaces a whole if-block: "the value if there is one,
// otherwise 123".
i := m["hellope"] or_else 123

// The same operator works with type assertions, because they carry the
// same "did it work?" semantics.
i = v.(int) or_else 123
Read it as a sentence and it needs no further explanation, which is the point of the operator's name.
or_else is exactly right when "absent" and "the fallback" mean the same thing to your program — a default port, a missing configuration value, an empty list. It is exactly wrong when the difference matters, because a fallback is precisely what hides the difference. The test to apply is simple: could I tell, afterwards, that the fallback was used? If not, and you would want to know, use the two-value form.
The Rich Shape: Error Unions
"It did not work" is rarely enough in real software. A file can be missing, a network can time out, memory can run out, and a caller may well want to treat those differently. That needs a value that says which failure happened — and Odin's answer is a union.
A Union of Possible Errors
The standard library shows the pattern clearly. From core:os, quoted verbatim:
// The error KINDS are ordinary enums, exactly as you met them in the
// structs lesson.
General_Error :: enum u32 {
    None,
    Exist,
    Not_Exist,
    Timeout,
    Broken_Pipe,
    Invalid_Path,
    // ...
}

// The error TYPE is a union of the kinds a caller might receive.
Error :: union #shared_nil {
    General_Error,
    io.Error,
    runtime.Allocator_Error,
    Platform_Error,
}

#assert(size_of(Error) == size_of(u64))      // one machine word
Three things are worth noticing here. The kinds are enums, so each is small and can be switched on. The error type is a union, so one value can carry any of them. And #shared_nil lets all the members share the nil state — which is how "there was no error at all" is represented.
The nil Error Means "Fine"
Because the union has a shared empty state, one comparison covers every kind. Both lines below come from the same standard-library file:
// The check for "no error" is a comparison with nil.
if ferr == nil {
    return ""
}

// And the "no error" value is the union's zero value.
ERROR_NONE :: Error{}
Two ideas you already know, meeting again. The nil sentinel from the pointers lesson is doing the same job here: a single, obvious empty state. And Error{} is the zero-value guarantee from the types lesson — a union with nothing in it.
That is why procedures return nil when nothing went wrong, and why the first thing an error helper does is compare against nil. It costs one comparison and there is nothing subtle to get wrong.
Dispatching with switch … in
When you do want to know which error it was, the union can be asked. The form is switch e in value, and the example is once more the real helper from core:os:
// Ask the union which member it holds, then switch on the enum inside it.
switch e in ferr {
case General_Error:
    switch e {
    case .None:          return ""
    case .Not_Exist:     return "file does not exist"
    case .Timeout:       return "i/o timeout"
    case .Broken_Pipe:   return "Broken pipe"
    case .Invalid_Path:  return "invalid path"
    // ...
    }
case io.Error:
    switch e {
    case .Permission_Denied: return "permission denied"
    case .Closed:            return "file already closed"
    // ...
    }
case runtime.Allocator_Error:
    switch e {
    case .Out_Of_Memory: return "out of memory"
    // ...
    }
}
Read the structure rather than the individual cases. The outer switch tells you which kind of error arrived; the inner switch tells you which case of that kind. Both levels are exhaustiveness-checked, so adding a new error variant turns into a compile error until you have dealt with it — the self-maintaining checklist from the enums lesson, now protecting your error handling.
A procedure that reports errors looks like this, condensed from the same family of standard-library code to the shape that matters:
Error_Kind :: enum { None, Invalid_Argument, Out_Of_Space }

// The procedure returns what it produced, plus an error.
read_bytes :: proc(count: int) -> (data: []u8, err: Error_Kind) {
    if count <= 0 {
        return nil, .Invalid_Argument      // a bare enum value is a valid error
    }

    // ... the real work ...

    return data, nil                       // nil means "no error"
}
Both returns deserve a second look. On failure the value is left empty and the error says why; on success the error is nil. There is no third state — no way to hand back a value while claiming something failed, or to claim success with nothing in hand, because the caller receives both together in one statement.
or_return
Now the piece that makes error handling bearable in practice. Everything so far has been honest; this is where it becomes short.
Passing a Failure Along
Picture a procedure that calls several fallible steps, each of which should be handed back to the caller if it fails. Written out plainly, it looks like this — and this is the code the language is trying to save you from:
// Three invented helpers, shown for the shape of it.
size, err := read_size(path)
if err != nil {
    return nil, err
}

data, err := read_data(size)
if err != nil {
    return nil, err
}

// ... and so on, three lines for every call ...
Every one of those blocks says the same sentence: if this failed, stop and pass the failure on. Odin lets you say it inside the call, with or_return. The mechanism, quoted verbatim from Odin's own demo file:
The concept of 'or_return' will work by popping off the end value in a
multiple valued expression and checking whether it was not 'nil' or
'false', and if so, set the end return value to value if possible.
Three clauses, and each one matters. It looks at the last result of the call. It tests that result against nil or false. And when the test says "failure", it fills in the enclosing procedure's own error result and returns immediately.
Here is the operator in the standard library, quoted from core:os:
// Attempt each call, then or_return: on failure, hand it straight back.
r = _new_file(uintptr(fds[0]), "", file_allocator()) or_return
w = _new_file(uintptr(fds[1]), "", file_allocator()) or_return
Read each of those lines as a sentence: make a file; if that failed, return the failure to my caller; otherwise store it in r and carry on. The check has not disappeared — it has moved into the call, where it cannot be forgotten, and it is now three words long.
Why Named Results Are Required
The demo's explanation continues with the rule that catches everyone the first time:
If the procedure only has one return value, it will do a simple return.
If the procedure had multiple return values, 'or_return' will require
that all parameters be named so that the end value could be assigned to
by name and then an empty return could be called.
In plain words: when a procedure returns several values, those values need names before or_return can work. That is exactly the named-result syntax from the procedures lesson, and here it is earning its keep:
// (new_file is a stand-in for the real call, for the shape of it.)
open_thing :: proc(name: string) -> (file: ^File, err: Error) {
    file = new_file(name) or_return

    // ... more steps, each one checked by or_return ...

    return          // a bare return hands back `file` and `err`
}
The last line is the second half of the rule. Once the results have names, a bare return sends back whatever they hold at that moment — the values produced by the successful calls, and nil for the error, because nothing ever assigned it.
When Not to Use It
or_return is not always the right tool, and knowing when to skip it is part of using it well. Three situations call for the explicit version:
- You want to handle the failure, not pass it on. Then check it and do something — fall back, retry, report.
- You want to change the error. Converting one kind into another, or adding context about what you were doing, means writing the return yourself.
or_returnpasses the original along untouched. - The error is not the last result.
or_returnalways looks at the final value, so a different ordering of results needs an explicit check.
Used where it fits, it turns eight lines into two. Used where it does not, it hides handling you actually wanted — which is the same rule that runs through this whole phase: make the error path visible first, then make it short.
defer: Cleanup That Cannot Be Skipped
You have been writing defer delete(...) since the collections lesson. Here are the mechanics, because two details about defer surprise almost everyone.
It Runs at the End of the Scope
Not the end of the function — the end of the scope in which it was written. Inside a loop, that means the end of each iteration, and that single fact is what makes defer perfect for per-frame work. Quoted from a real example:
for !rl.WindowShouldClose() {
    defer free_all(context.temp_allocator)     // runs EVERY iteration

    handle_input(&state, font)
    // ...
}
Read that as a budget. Whatever this frame puts into the scratch allocator is released when the frame ends — the same line, every frame, with no bookkeeping and no chance of drift as the loop body grows. It is exactly the per-frame scratch pattern from the allocators lesson, and it is a large part of why temp_allocator exists at all.
The same rule explains something that may have puzzled you: a defer written inside an if block fires when that block ends, not when the procedure does. Defers attach to the block they are written in, which is usually what you want and occasionally worth remembering.
Defers Run in Reverse
Several defers in one scope run in the opposite order to the one you wrote them in:
load_pair :: proc() {
    big := make([]u8, 4096, context.allocator)
    defer delete(big)               // scheduled first  → runs LAST

    small := make([dynamic]u8, 0, 64, context.allocator)
    defer delete(small)             // scheduled second → runs FIRST

    // ... work with both ...
}
Last scheduled, first run — the same way nested braces close from the inside out. That ordering is exactly right when resources depend on each other, because you schedule the cleanups in the order the dependencies allow, and the reverse order takes care of itself.
And now the pair you have been writing all along has a reason attached:
buffer := make([dynamic]u8, 0, 1024, context.allocator)
defer delete(buffer)        // written together, so they cannot drift apart
Two lines, side by side. Written as a pair they cannot be separated by a later edit, and because defer runs on every exit path — an early return, a failed check, the end of a loop turn — no new exit path can bypass the cleanup. With no garbage collector to fall back on, this tiny habit is what stands between your program and a slow leak.
Assertions
Sometimes the right response to a broken assumption is to stop immediately. Odin gives you two ways to say that, and they work at different moments.
assert — the Runtime Check
assert is an ordinary procedure call that stops the program when its condition is false. You have seen it in the standard library's examples:
// From the standard library's own documentation examples.
assert(len(small_items) == 8)
assert(index == 0 && found == true)
Use it for things that must already be true if your code is correct: an invariant, a precondition, a value you would far rather crash on than use. It is not an input validator — it is a statement about your own reasoning, written where the reasoning happened.
What happens when one fails is decided by the context, which is why this belongs in the same phase as the allocators lesson: assertion_failure_proc is one of the five fields you met there. A program can therefore decide how a failed assertion is reported, and the build can be told to drop assertions entirely for a release build.
#assert — the Compile-Time Check
Add a hash and the check moves to compile time. The build fails instead of the program, and nothing at all is left in the binary:
// Quoted from core:os, where it guards the size of the error union.
#assert(size_of(Error) == size_of(u64))

// And a few of the layout facts from earlier lessons:
#assert(size_of(Particle) == 24)
#assert(size_of(Vector2) == 8)
The difference in one line: #assert fails the build, assert fails the run. Which one you want follows from when the fact becomes true. Facts about your types are true before the program starts, so a programmer is the only one who needs to be told — #assert. Facts about values only exist once the program runs, so assert is the one that can check them.
Where This Goes Next
Phase 5 continues with the machinery that lets you write one piece of code for many types — parametric polymorphism — and then with the compile-time programming tools that make some of it disappear entirely.
The Page in One Breath
- Failure is a value in the results. Nothing throws, and a procedure that can fail says so in its signature.
- Two shapes cover everything:
(value, ok: bool)for a single failure,(value, err: Error)when the reason matters. or_elsegives a fallback in one line — use it when "absent" and "the fallback" mean the same thing.- An error type is usually a union of error kinds, with
#shared_nilso that oneerr == niltest means "no error". switch e in errdispatches on the kind; the inner switch handles the case. Both are exhaustiveness-checked.or_returnpops the last result, and returns early if it is not nil or false — it needs named results when there are several.deferruns at the end of its scope (each loop iteration included), in reverse order, and on every exit path.assertchecks while running;#assertchecks while compiling and leaves nothing in the binary.
parse_age from the start of this page and change it to return a real error kind — an enum with Empty and Not_A_Number. Then write a caller that uses or_return, and a second caller that switches on the error to print a useful message. You will have used every idea on the page.
Continue with Parametric Polymorphism →