
Loops & Iteration
Read this lesson next to your editor if you can. Loops are physical — you understand them by typing them and watching the output, not by reading about them.
One Loop to Rule Them All
Most languages give you a small zoo of loops: while, do while, foreach, the C-style for, and sometimes more. Odin gives you one keyword, for, in four shapes.
No while, No foreach
There is no while keyword in Odin and no foreach. Both ideas live inside for, and the compiler can see at a glance which kind of iteration you wrote:
// The four shapes, side by side. Each is a `for` statement.

for i in 0..<5 { }            // 1. over a RANGE
for item in collection { }    // 2. over a COLLECTION
for ready == false { }        // 3. while a CONDITION holds
for { }                       // 4. forever (until something breaks out)
Why does this matter? Because with one keyword there is only one thing to learn, and the shape of the line tells you which form you are looking at. You never have to ask whether this language's do while tests before or after the body — the form names that answer in its first tokens.
The Four Forms
Here is the same list with each form in a real snippet, in the order we will study them:
| Form | Looks like | Use it when |
|---|---|---|
| Range | for i in 0..<5 | You know how many times to repeat |
| Collection | for item in items | You want each element of something |
| Condition | for i < 5 | You repeat until something changes |
| Infinite | for | A server or an event loop that runs until told to stop |
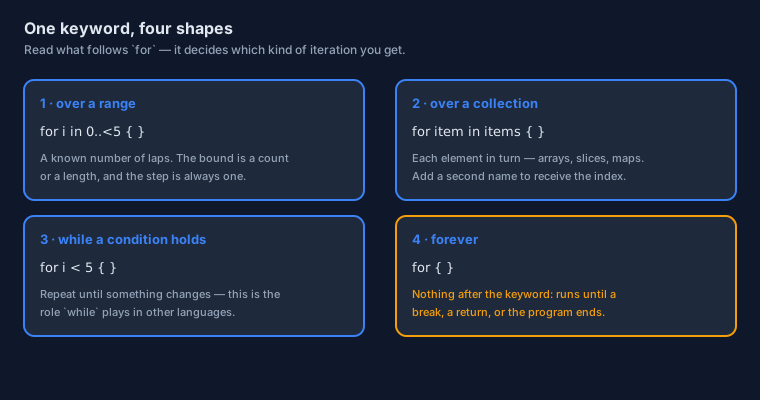
for is what decides which kind of iteration you get.Looping Over a Range
A range is a run of numbers, and looping over one is the simplest thing a loop can do. Odin writes ranges with two dots and a comparison-like mark:
The Exclusive Range ..<
0..<5 reads as "from zero up to, but not including, five". The upper bound is left out:
for i in 0..<5 {
    fmt.println(i)      // 0 1 2 3 4
}
The exclusive form is the natural partner of arrays, because it can be bounded by a length. A collection of five items has indices 0 to 4, which is exactly what 0..<len(items) produces:
items := []int{10, 20, 30}

for i in 0..<len(items) {
    fmt.println(i, items[i])   // 0 10 / 1 20 / 2 30
}
The Inclusive Range ..=
1..=10 includes both ends. Human language is inclusive — we say "count from one to ten" and mean ten — so when the bounds come from the problem rather than from an array, this form often reads better:
total := 0

for i in 1..=10 {
    total += i
}

fmt.println(total)   // 55
The Explicit Counter Form
Sometimes a range is not enough: you need a step of two, or to move the index around inside the loop. For that, Odin has the counted form you may know from C — initialise, test, step, all in one line:
items := []int{10, 20, 30, 40, 50, 60}

// initialise `i`   then test          then step
for i := 0; i < len(items); i += 1 {
    fmt.println(items[i])
}

// Every other element: the step is whatever you write.
for i := 0; i < len(items); i += 2 {
    fmt.println(items[i])   // 10 30 50
}
Two details to notice. The counter i is declared inside the loop, so it does not exist afterwards and cannot collide with another i later in the same procedure. And the step is i += 1, never i++ — the absence of the increment operator you met in the operators lesson is felt most often right here, and it costs you two extra characters per loop.
Looping Over a Collection
Counting from zero to four is practice. The loop you will write most often in real code visits the data you already have: an array, a slice, a map.
Value First, Index Second
Write one name after for and you get each element. Write two and you get the element and its position — with the value first, which is the opposite of the C-style habit many people bring with them:
names := []string{"Ada", "Bill", "Grace"}

// One name: the values only.
for name in names {
    fmt.println(name)          // Ada / Bill / Grace
}

// Two names: VALUE first, then the INDEX.
for name, index in names {
    fmt.println(index, name)   // 0 Ada / 1 Bill / 2 Grace
}
int where you expected a string and a strange-looking output. Whenever a loop body misbehaves, check the order of those two names first.
The same shape works for fixed-length arrays and dynamic arrays alike; you do not need to know which one you are holding:
numbers := [3]int{7, 8, 9}

for number, i in numbers {
    fmt.println(i, number)     // 0 7 / 1 8 / 2 9
}
Walking a Map
A map is a collection of key-value pairs, so its loop hands you both halves. Because the key is what identifies the element, the key comes first — the same rule you just learned, seen from the map's point of view:
ages := make(map[string]int)
defer delete(ages)

ages["ada"]  = 36
ages["bill"] = 44

// KEY first, then the value stored under it.
for name, age in ages {
    fmt.printfln("%s is %d", name, age)
}
One important warning: map iteration has no guaranteed order. Odin stores entries in a hash table, so they come out in whatever order the table happens to be in — and that order can change as the map grows. If you need a predictable sequence, collect the keys, sort them, and loop over that.
Ignoring What You Do Not Need
Sometimes you need only one of the two things a loop offers. The underscore you met in the naming lesson is the way to say "I am deliberately not using this":
// Only the index matters, so the value is discarded on purpose.
for _, index in names {
    fmt.println("position", index)
}
Using _ rather than inventing a name is not just tidiness. It tells the next reader that the omission is intentional rather than forgotten, and it keeps tools like the unused-variable vet checks quiet about a value you never wanted.
Looping While Something Is True
Not every repetition has a known count. Sometimes you repeat until the situation changes — and that is what the condition form is for.
The Condition Form
Drop the initialiser and the step, keep the test, and you have the loop that other languages spell while:
i := 0

// No initialiser, no step — repeat as long as the condition holds.
for i < 5 {
    fmt.println(i)
    i += 1        // YOU move the loop forward
}
The condition is tested before each lap, which has one pleasant consequence: if it is already false when the loop is reached, the body never runs at all.
remaining := 0

// This body never runs, because the condition is false immediately.
// That is a feature: an empty collection needs no special case.
for remaining > 0 {
    remaining -= 1
}

fmt.println("done")   // done
Now the responsibility that comes with this power: you must move the loop towards its end. Forgetting the update is the classic infinite loop, and the compiler cannot help you, because it has no way to know that the body failed to change anything. When you write this form, read the body once and point at the line that makes the condition eventually false.
The Everlasting Loop
Leave everything out and the loop simply runs forever. That sounds useless and is in fact essential: servers, event loops, interactive shells and game loops are all shaped like this.
// A tiny read-print loop. (The helper next_line is a stand-in for
// however you actually read input — the shape of the loop is the lesson.)
for {
    line := next_line()

    if line == "" {
        break          // the ONLY way out of this loop
    }

    fmt.println("you typed:", line)
}
Because there is no condition to fail, something inside must decide to leave — a break, a return, or the program ending. That is also why an accidental everlasting loop is such an easy mistake to make: a for with a body that never breaks will happily run until you stop it.
for i in 0..<5 says "five times", for item in items says "everything here", for i < 5 says "until this stops being true", and for says "until something inside stops me". One keyword, four clear sentences.
break, continue, and Labels
Two small keywords let a loop change its own mind from the inside.
break and continue
break leaves the loop immediately. continue abandons the rest of the current lap and starts the next one. Both act on the innermost loop they appear in:
// break: stop as soon as we have seen enough.
for i in 0..<100 {
    if i == 3 {
        break
    }
    fmt.println(i)     // 0 1 2
}

// continue: skip the rest of THIS lap, then carry on with the next.
for i in 0..<6 {
    if i % 2 == 0 {
        continue       // even numbers are skipped entirely
    }
    fmt.println(i)     // 1 3 5
}
The continue form is worth internalising, because it is how you write loops whose body has a filter at the top. Read the conditions first, and the work below them happens only for the values that survived.
Labelled Loops
Nested loops raise a question that plain break cannot answer: what if I want to leave both loops? Odin lets you label a loop and name that label when you break out of it:
grid := [3][3]int{
    {1, 2, 3},
    {4, 5, 6},
    {7, 8, 9},
}

// The label `search` names the OUTER loop, so `break search` leaves both.
search: for row, y in grid {
    for value, x in row {
        if value == 5 {
            fmt.printfln("found 5 at column %d, row %d", x, y)
            break search
        }
    }
}
Without the label, break would only abandon the inner loop — and the outer loop would carry on scanning rows you no longer care about. The label is the written evidence that you meant to leave everything at once.
Patterns Worth Knowing
Two shapes appear in real code again and again, and they are both worth typing out once.
Nested Loops and Grids
When data has rows and columns, the loop that walks it has a loop inside a loop:
// A multiplication table. The outer loop walks the rows;
// the inner loop fills each row in.
for row in 1..=3 {
    for column in 1..=3 {
        fmt.printf("%4d", row * column)
    }
    fmt.println()          // end the row with a newline
}
//    1   2   3
//    2   4   6
//    3   6   9
Two things are worth noticing here. The inner loop runs completely for every single step of the outer loop — that multiplicity is the whole point of nesting, and it is also where the cost of a nested algorithm comes from. And the pattern printf inside the loop with println after it is the standard way to build output one line at a time.
Counting Down
Ranges only count upwards, so a countdown is written with the counted form, where the step is free to be negative:
for i := 5; i > 0; i -= 1 {
    fmt.println(i)      // 5 4 3 2 1
}

fmt.println("liftoff!")
Odin does have a directive for walking a collection backwards, but it is not applied to ranges — so a range that counts down is written exactly as above. That is no loss: the step i -= 1 states the direction on the same line as the loop, which is more than can be said for a reversed range hidden in a helper.
Where This Goes Next
That is the end of Phase 2. You can now hold values, compute with them, choose between alternatives, and repeat work — which is to say, you can write real programs. The next phase turns outward: instead of using the built-in types and procedures, you will build your own.
The Page in One Breath
- Odin has one loop keyword,
for, in four shapes. There is nowhileand noforeach. 0..<nexcludes the upper bound and pairs naturally with lengths;1..=nincludes it.- Collections give the value first and the index second; maps give the key first, in no guaranteed order.
- The condition form tests before each lap, so the body may never run — and you must move the loop forward yourself.
for { }runs until abreak, areturn, or the end of the program.breakleaves the innermost loop,continuestarts the next lap, and a label names the loop you meant to leave.
continue.
Continue with Procedures & Parameters — the beginning of Phase 3 →