
Packages & Modules
Package.swift manifest. This lesson turns a folder of source files into a library that another project can depend on.
Everything so far fit in a single file. That is the right way to learn a language, and the wrong way to ship one: a growing program needs a stated surface — what other code may use, and what stays internal — plus a repeatable way to build, test, and version it.
Modules & Access Control
A module is a unit of compilation and of namespacing. An app is a module, a framework is a module, and each target in a package is a module. Inside a module every type can see every other type; across a module boundary, only what you deliberately expose is reachable.
What a Module Gives You
Two boundaries appear the moment code is split into modules: what is visible outside, and what the compiler must recompile when a file changes. Both come from the same declaration.
// SensorKit/Reading.swift — inside the SensorKit module
struct Reading {                     // internal by default: module-private in effect
    let sensor: String
    let celsius: Double
}

public struct Sensor {
    public let name: String
    // A public initializer is required: the internal memberwise one is not
    // visible outside the module, so callers would otherwise have no way in.
    public init(name: String) { self.name = name }

    // A public method may NOT return the internal `Reading` type: callers
    // outside the module could not even name the result. Two ways out —
    // return a public or tuple type, or make `Reading` public as well.
    public func snapshot() -> (sensor: String, celsius: Double) {
        let reading = Reading(sensor: name, celsius: 0)   // internal use is fine
        return (reading.sensor, reading.celsius)
    }
}

// App/main.swift — in a different module
import SensorKit

let sensor = Sensor(name: "t1")      // public type and public init: reachable
print(sensor.name)                   // public property: reachable
print(sensor.snapshot())             // (sensor: "t1", celsius: 0.0)
// let reading = Reading(sensor: "t1", celsius: 0)   // error: Reading is internal
The public surface of a module is a promise you have to keep. Every public declaration can be used by someone else, so widening access is easy and narrowing it later breaks builds — decide the surface deliberately, and keep it as small as the module's purpose allows.
Access Levels
Swift has five access levels, and they are a ladder: each one is visible everywhere the more restrictive one is. Choosing the lowest level that works keeps the surface honest and gives the compiler more freedom to optimise.
| Level | Visible in | Use it when |
|---|---|---|
open |
Other modules, and subclassable or overridable there | You design a class or method for outside subclasses (rare) |
public |
Other modules, but not overridable outside them | Library API that consumers call or read |
internal (default) |
The whole module | Everything that is not part of the published surface |
fileprivate |
The declaring file only | Two types in one file need to share an implementation detail |
private |
The enclosing declaration, plus extensions in the same file | State that must not be reachable even from the rest of the file |
Two details save time later. First, private is scoped to the enclosing declaration and its extensions in the same file, so a type and its extensions can share private state without widening access. Second, access propagates: a public type must not expose an internal type in its signature, which is exactly the error shown above.
Importing
An import makes one module's public declarations visible in the current file. It can be narrowed to a single declaration, which keeps the namespace clean and makes a dependency obvious.
import Foundation                  // the whole module
import struct Foundation.Date      // one type only — a deliberate, narrow import
import func Foundation.pow         // one function
// @testable import SensorKit      // test-only: also exposes internal members

// A plain import also re-exports nothing: if SensorKit's API mentions Date,
// the file that uses SensorKit still needs its own `import Foundation`.
// SwiftPM does not transpose transitive imports for you.

// `typealias` is the usual tool for renaming a type you import:
typealias Day = Foundation.Date
let today: Day = Day()             // explicit, greppable, and short
Prefer a narrow import when you need one item from a large module; prefer the plain import when the type is used throughout the file. The rule that matters most, though, is the second comment: imports are not transitive, so a type you use must be imported by your file.
The Swift Package Manager
SwiftPM is the build system that ships with Swift. A package is a directory containing a manifest called Package.swift; the manifest is Swift code, so the configuration is compiled and type-checked like everything else you write.
The Manifest
The manifest declares four things: the package's name, the products it publishes, the targets it builds, and the external packages it needs. Products are what consumers import; targets are what the compiler builds.
// swift-tools-version: 5.9
// ^ The FIRST line, in a comment, must state the tools version. It decides
//   which manifest API is available, not which Swift version compiles the code.
import PackageDescription

let package = Package(
    name: "SensorKit",

    // Minimum platform versions. Omit this and the code must work everywhere,
    // including APIs that no modern OS still uses.
    platforms: [.macOS(.v13)],

    // Products are the public face of the package: a library others import,
    // or an executable they run.
    products: [
        .library(name: "SensorKit", targets: ["SensorKit"]),
        .executable(name: "sensor-demo", targets: ["SensorDemo"])
    ],

    // External packages, pinned by a version requirement.
    dependencies: [
        .package(url: "https://github.com/apple/swift-argument-parser.git", from: "1.3.0")
    ],

    // Targets are the modules themselves. A .target is a library module,
    // .executableTarget has a main entry point, .testTarget runs the tests.
    targets: [
        .target(
            name: "SensorKit",
            dependencies: [
                // Pull in one product from a declared package. The `package:`
                // argument names the package, not the repository URL.
                .product(name: "ArgumentParser", package: "swift-argument-parser")
            ]
        ),
        .executableTarget(name: "SensorDemo", dependencies: ["SensorKit"]),
        .testTarget(name: "SensorKitTests", dependencies: ["SensorKit"])
    ]
)
Read it as a contract: products answers "what may others use", targets answers "what does this package build", and dependencies answers "what do I need from outside". Everything else in a manifest is a refinement of those three.
Directory Layout
SwiftPM has conventions, and following them means writing almost no path configuration. Each target's sources live in a folder named after the target under Sources/, and each test target under Tests/.
| Path | Contents | Notes |
|---|---|---|
Package.swift |
The manifest | Required; sits at the package root |
Sources/SensorKit/*.swift |
Sources of the SensorKit target |
Folder name must match the target name |
Sources/SensorDemo/main.swift |
Entry point of the executable target | main.swift is allowed to contain top-level code |
Tests/SensorKitTests/*.swift |
Tests for the library target | Each test target needs at least one file to exist |
Package.resolved |
Exact resolved versions of every dependency | Generated; commit it for apps, think twice for libraries |
Create the skeleton with swift package init --type library (or --type executable) instead of by hand — the generated manifest already has the correct tools version and the folders in the right places.
Targets & Their Graph
Each target is a module, and the dependencies array inside a target is what creates the module boundary. A target may import a module only if it was declared as a dependency, which means the dependency graph in the manifest is the only way code can reach across.
// SensorKit/Reading.swift — library target: knows nothing about the app
public struct Reading {
    public let sensor: String
    public let celsius: Double
    public init(sensor: String, celsius: Double) {
        self.sensor = sensor
        self.celsius = celsius
    }
}

// SensorDemo/main.swift — executable target: depends on SensorKit
import SensorKit                    // allowed: "SensorKit" is a target dependency

@main                               // the entry point for an executableTarget
struct Demo {
    static func main() {
        let reading = Reading(sensor: "t1", celsius: 21.5)
        print(reading.celsius)      // 21.5
    }
}

// What the graph forbids, and why it matters:
//  - a cycle: SensorKit cannot depend on SensorDemo, because the demo needs
//    SensorKit to build. Circular target dependencies are rejected by SwiftPM.
//  - importing without declaring: `import SensorKit` inside a target that did
//    not list it is an error, even if another target in the package did.
The graph is also a design tool. A library target that depends on nothing else is testable in isolation; an executable that depends on several libraries is where the wiring lives. When a target needs a dependency it should not have, that is usually a sign a responsibility sits in the wrong module.
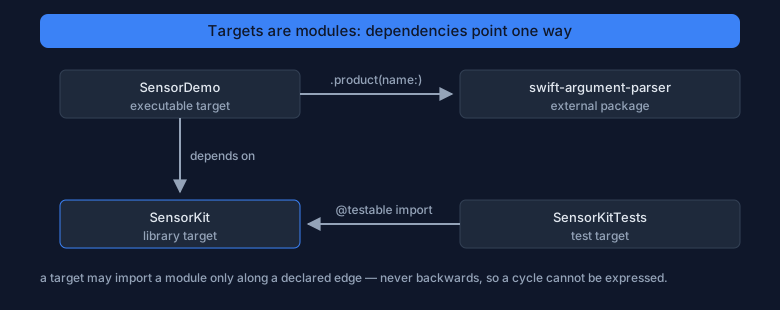
Figure 1 — a target may import a module only along a declared edge. Test targets depend on the library, never the other way round.
Dependencies
A dependency is a promise with a version attached. SwiftPM resolves it once, records the exact result, and rebuilds only what changed — but only if the requirement you wrote says what you meant.
Declaring a Dependency
Declaring happens in two steps: name the package in the top-level dependencies list, then pull the specific product into the target that uses it. Skipping the second step is the most common mistake, because the package resolves but the import still fails.
// Step 1 — in the package's `dependencies`: where the code comes from.
dependencies: [
    .package(url: "https://github.com/apple/swift-argument-parser.git", from: "1.3.0")
],

// Step 2 — in the target's `dependencies`: what this module imports.
targets: [
    .target(
        name: "SensorDemo",
        dependencies: [
            // `name` is the product's name; `package` is the package's name.
            // To find both, open the dependency's Package.swift and read its
            // `products` and `name` — they are frequently different words.
            .product(name: "ArgumentParser", package: "swift-argument-parser")
        ]
    )
]

// A local package is declared by path, which is what you use while developing
// two packages together.
// .package(path: "../SensorCore")
Local path dependencies are the practical way to work on a library and its consumer at once: no publishing, no version bumping, and changes are picked up on the next build.
Version Requirements
A requirement is a rule for choosing a version, and from: is the one people misread: it means "this version or any later one up to the next major version". Choosing the wrong form is how a library silently adopts a breaking change.
| Requirement | Meaning | Reasonable when |
|---|---|---|
from: "1.3.0" |
1.3.0 up to (but not including) 2.0.0 | The dependency follows semantic versioning — the usual choice |
.upToNextMinor(from: "1.3.0") |
1.3.0 up to (but not including) 1.4.0 | A minor release has broken you before, and you want stability |
.exact("1.3.0") |
That version and no other | Debugging a version-specific bug, or reproducing a build |
.range("1.3.0"..<"1.5.0") |
Any version in the range | You need a fix from one version and cannot take the next |
.branch("main") |
The tip of a branch | Development only — the build is not reproducible |
.revision("abc123") |
One specific commit | Pinning an unreleased fix while waiting for a tag |
Two rules keep this simple. Use from: for anything that follows semantic versioning, because it lets bug fixes and features in while excluding major versions. Never depend on a branch in released code — the code under that name will change without your build changing.
Resolution & the Lock File
Resolution takes the requirements of every package in the graph — yours and your dependencies' — and picks the highest version that satisfies all of them at once. The result is written to Package.resolved, so every machine builds the same code.
# Resolve the graph and write Package.resolved. Runs automatically before a
# build, but explicit is better when you have just edited the manifest.
swift package resolve

# Move dependencies forward within the allowed range. The intermediate
# Package.resolved is discarded, so this is the command that updates pins.
swift package update

# Print the resolved graph as a tree. The fastest way to answer
# "who brought this package in?"
swift package show-dependencies

# Throw away the resolved pins and resolve from scratch — the fix for a
# confusing conflict after switching branches.
rm Package.resolved && swift package resolve
When resolution fails, the error names the conflicting requirements: two packages want the same dependency in ranges that do not overlap. The fix is always a version decision — widen one requirement, or pick a version of your direct dependency that agrees with the rest of the graph.
Building, Testing & Resources
A package that builds on one machine and not another is a packaging bug, not a language bug. The commands below are the whole workflow, and running them in a clean checkout is the only real test of the manifest.
Build & Run
# Debug build by default: fast to compile, with assertions enabled.
swift build

# Release build: optimised, no assertions, what you ship and measure.
swift build -c release

# Build one target only, which is much faster in a larger package.
swift build --target SensorKit

# Run an executable product, passing arguments through with `--`.
swift run sensor-demo -- --sensor t1

# Compile and run the tests.
swift test

# Inspect what the build produced.
swift build --show-bin-path
Prefer swift run over invoking the binary by path while developing: it rebuilds first, so the executable you run is always the code you just wrote.
Testing
A test target is an ordinary module whose dependency is the library under test. @testable import widens access to internal for tests only, which is why a library can keep its surface small and still be tested thoroughly.
// Tests/SensorKitTests/ReadingTests.swift — XCTest, supported everywhere
import XCTest
@testable import SensorKit      // test-only access to internal declarations

final class ReadingTests: XCTestCase {
    func testSnapshotKeepsSensorName() {
        let sensor = Sensor(name: "t1")
        XCTAssertEqual(sensor.snapshot().sensor, "t1")   // fails loudly with both values
    }

    // A test that can throw is written `throws`; a thrown error fails the test.
    func testReadingStoresValues() throws {
        let reading = Reading(sensor: "t1", celsius: 21.5)
        XCTAssertEqual(reading.celsius, 21.5, accuracy: 0.001)   // floats need accuracy
    }
}

// Swift Testing — the newer framework, same target, different style.
import Testing

@Suite("SensorKit")
struct SensorSuite {
    @Test("snapshot carries the sensor name")
    func snapshot() {
        #expect(Sensor(name: "t1").snapshot().sensor == "t1")
    }
}
Both frameworks run from the same swift test. XCTest is the safe choice for existing code and for anything that must run on older toolchains; the @Test/#expect style reads closer to a specification and reports the failing expression rather than a line number.
Resources
Files that ship with a module are declared as resources in the target, and read at runtime through the module's own bundle. Declaring them is not optional: a file that is not listed is simply not copied into the build.
// In Package.swift, inside the .target declaration:
.target(
    name: "SensorKit",
    dependencies: [],
    resources: [
        // .process: apply platform rules (asset catalogs, property lists) and
        // optimise images. The usual choice.
        .process("Resources"),
        // .copy: copy the directory or file verbatim, structure preserved.
        .copy("Fixtures")
    ]
)

// In code, read a resource through the module's bundle. `Bundle.module` is
// generated by SwiftPM for any target that declares resources.
import Foundation

enum Defaults {
    static func load() throws -> Data {
        guard let url = Bundle.module.url(forResource: "defaults", withExtension: "json") else {
            // Missing resources are a packaging mistake, not an input error.
            throw CocoaError(.fileNoSuchFile)
        }
        return try Data(contentsOf: url)
    }
}
Use Bundle.module, never Bundle.main: the main bundle belongs to the executable, so a library that reads from it works in the app and fails in tests. This mistake survives local runs and appears only when the library is used from somewhere else.
Pitfalls & Practice
Packaging failures are uncomfortable because they look like language failures. The build says a type is unavailable, the app crashes on a missing file, or a teammate gets a different version — and in every case the cause is in the manifest or the layout.
Common Pitfalls
// 1. Marking everything public "in case it is needed". Access is a promise: a
//    public type can never be removed without breaking someone. Start at
//    internal and widen only when a real caller exists.

// 2. Declaring the package dependency but forgetting the target dependency.
//    Resolution succeeds, the module downloads, and the import still fails.
//    Both lists must mention the dependency, for different reasons.

// 3. Using @testable import in product code. It needs a testing-enabled build,
//    so it compiles locally and fails in a release build. Tests only.

// 4. A circular target dependency. SwiftPM rejects it, and the message names the
//    cycle: the fix is to move the shared code into a third target both depend on.

// 5. Reading resources through Bundle.main from inside a library. It works when
//    the library is linked into an app and breaks under `swift test`.

// 6. Editing Package.swift without resolving. The manifest and Package.resolved
//    are then out of step, and the build uses pins you no longer intend.

// 7. Committing .build/ (a machine-specific build directory) while ignoring
//    Package.resolved. For an app the lock file is what makes builds reproducible.
Each of these has the same shape: something is stated twice, or stated implicitly, and only one of the two places is correct. When a build behaves strangely, check the manifest and the layout before checking the code.
Practice Lab
Build one package end to end; the manifest stops feeling like configuration once you have written it yourself.
- Create a library. Run
swift package init --type library, rename the target to something of your own, and confirm thatswift buildandswift testboth pass before you change anything. - Draw the boundary. Add a public type with a public initializer and an internal helper. Try to use the helper from a test target without
@testable, and read the error carefully. - Add an executable. Add an
executableTargetthat depends on the library, use@main, and run it withswift run. Then remove the target dependency and confirm the import fails. - Take a dependency. Add an external package with
from:, wire one of its products into your target, and runswift package show-dependenciesto see the resolved graph. - Ship a resource. Add a JSON file to a
Resourcesfolder, declare it with.process, read it throughBundle.module, and verify the test still passes.
That completes Phase 4. Phase 5 moves from building software to studying it: Lab Examples collects the single-file demos you can run and modify, and Study Projects takes the same ideas into complete programs.