
Toolchain & Environment
A toolchain is simply the set of programs that turn your source file into something the computer can run. Odin keeps its toolchain refreshingly small: one compiler driver, one formatter, and the standard libraries that travel with them.
Installing the Toolchain
Odin ships as a self-contained folder. You do not need to compile the compiler to use it, and there is no package manager to learn first.
What You Need
- A downloadable release from the official installation guide — prebuilt for Windows, macOS, and Linux.
- A C toolchain. Odin links your programs through the system linker, so a small C toolchain is required: on Windows the MSVC compiler and Windows SDK, on Linux Clang, and on macOS the Xcode command-line tools.
- About 200 MB of disk space, mostly for LLVM, which is included inside the release folder.
Windows
- Install the Visual Studio Build Tools and tick Desktop development with C++. This provides the linker Odin calls at the end of a build. (You can install the free Community edition of Visual Studio instead if you prefer the full IDE.)
- Download the Odin release for Windows and extract it to a short path with no spaces, for example
C:\odin. Long paths with spaces are the number one cause of confusing build errors. - Add that folder to your
PATHso the terminal can findodin. In PowerShell you can test it afterwards withodin version.
macOS and Linux
- Download the matching release archive and extract it, for example to
~/odin. - Add
~/odinto yourPATHby editing your shell profile (~/.bashrc,~/.zshrc, or similar). - macOS: install the Xcode command-line tools with
xcode-select --install— the system linker comes from there. - Linux and other Unix systems: install Clang, which Odin uses for linking (for example
apt install clangon Debian or Ubuntu,dnf install clangon Fedora).
Building From Source
You rarely need this, and beginners should skip it. Building Odin from source is only useful if you work on the compiler itself or need a platform that has no prebuilt release. The download page links to the source repository and the instructions for that path.
Verifying the Install
Before writing any code, let us confirm that the terminal can actually find the compiler. This one check saves a lot of confusion later.
Check the Version
Open a new terminal — a fresh one is important, because only new terminals pick up the PATH change you just made — and ask Odin who it is:
odin version
# Prints the compiler version together with the commit hash of the release.
# The exact text depends on which release you downloaded — any output means
# the install worked.
If you instead see "command not found" or "is not recognized as an internal or external command", the folder is not on your PATH yet. Fix that first; nothing else will work until the terminal can find the command.
Where Odin Keeps Things
The compiler locates its libraries relative to its own folder, so as long as you keep the release intact you can move the whole directory anywhere. If you do move pieces around separately, set the ODIN_ROOT environment variable to point at the release folder and the compiler will use that instead.
Your First Program
Every language has a first program. Odin's is a friendly pun on the classic one — and it is short enough to read line by line, which is exactly what we are going to do.
Hellope, World
Create an empty folder — call it hellope — and inside it create a file named main.odin containing this:
package main                        // every Odin file names its package

import "core:fmt"                   // fmt is the printing/formatting package

main :: proc() {                    // the entry point: a procedure named `main`
    fmt.println("Hellope, World!")  // write one line to standard output
}
Four lines, and each one has a job:
package main— this file belongs to a package calledmain. The compiler insists that every file declares its package, which is why you see it at the top of every Odin file you will ever read.import "core:fmt"— bring in the standard-library package for formatting and printing. Thecore:prefix means "this ships with the compiler".main :: proc() { ... }— declare a procedure calledmain. The::symbol means declare this name, andprocis how Odin spells "procedure".fmt.println(...)— call a procedure from that imported package, and finish the statement.
Compile and Run
From inside the hellope folder, ask the compiler to build the current directory and run the result:
odin run .
# Hellope, World!
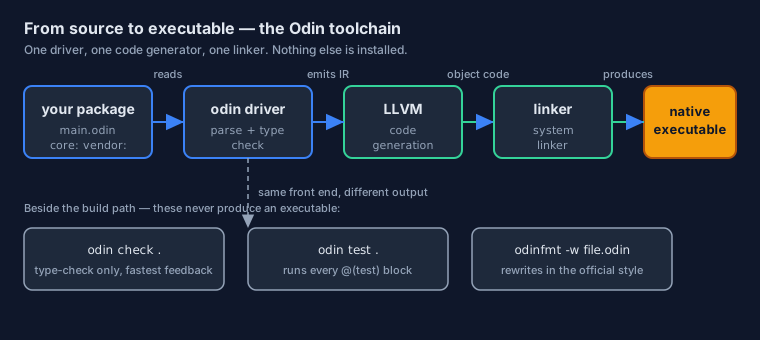
That is the whole workflow. Behind that single command, Odin compiled main.odin into a native executable, placed it next to your sources, and then ran it for you. If you only want the executable and no execution, use odin build . instead.
. is not decoration — it means this directory. Odin builds directories, not files, because a directory is a package. We will look at that idea closely in a moment.
The Commands You Will Use Every Day
Odin's command-line interface is small enough to memorise. You could learn the whole language with six commands, and these are the six.
Building and Running
odin run and odin build are the same compilation with one difference: run executes the result afterwards. Both accept flags that change how the binary is produced.
# Compile the current directory into an executable and then run it.
odin run .

# Compile only. The executable lands next to your sources.
odin build .

# Name the output yourself.
odin build . -out:myapp

# Build for speed instead of for debugging.
odin build . -o:speed
By default Odin builds in a debugging-friendly mode with safety checks enabled — bounds checks, overflow checks, and useful runtime messages. When you are ready to ship, optimisation flags such as -o:speed and -o:size trade those checks for raw performance or a smaller file.
Checking, Formatting, and Testing
Three smaller commands do an enormous amount of quiet work for you. Get into the habit of running them and your code will stay healthy without effort:
# Type-check the package WITHOUT producing an executable.
# The fastest way to find mistakes while you are still typing.
odin check .

# Run every `@(test)` block in the package.
odin test .

# Format one source file in place, using the official style.
odinfmt -w main.odin
Formatting deserves a special mention. Odin has one style that the community actually writes, and odinfmt applies it for you. It is installed alongside the language server (the OLS project ships odinfmt with it), and its behaviour is fixed by a three-line odinfmt.json: character_width, tabs, and tabs_width. The defaults — 120 columns, tabs, four columns per tab — are exactly what the standard library and the official examples are written in, which is why nobody argues about them. Run it and your code becomes indistinguishable from code written by everyone else.
Command Cheat Sheet
Keep this table nearby for the first week; after that you will not need it.
| Command | What it does | When you use it |
|---|---|---|
odin run . | Compile the directory, then execute the result | While learning and iterating |
odin build . | Compile the directory into an executable | When you need the binary itself |
odin check . | Type-check without linking | Quick feedback, no build artifact |
odin test . | Compile and run the @(test) blocks | Before you commit a change |
odin version | Print the compiler version | Reporting problems, checking upgrades |
odinfmt -w file.odin | Rewrite a file in the official style | Keeping formatting out of code review |
How Odin Sees Your Files
Odin's mental model of a project is slightly unusual, and ten minutes spent here will save you hours of confusion. The rule is short: a directory is a package.
A Directory Is a Package
Every .odin file in a single folder belongs to one package, and the files in that folder can use each other's declarations freely — no imports between them. This is why the compiler needs a directory: it wants the whole package.
Add a second file to your hellope folder and the picture becomes clear:
// math_utils.odin — sitting in the SAME folder as main.odin

package main    // the package name must match the other files in this folder

// No import statement is needed for main.odin to call this.
add :: proc(a, b: int) -> int {
    return a + b
}
Now main.odin can simply write add(2, 3). Imports are for reaching other packages — core:fmt, vendor:raylib, or another folder in your own project.
package main? Because the compiler reads files independently and must know which package each one belongs to. It also means you can move a file between folders and immediately see whether it still belongs where it is.
One File as a Package
When you are experimenting and do not want to create a folder, add -file. This tells Odin to treat a single source file as a complete package:
# Compile and run just this one file, as if it were its own package.
odin run hellope.odin -file
Setting Up Your Editor
Odin is perfectly usable in a plain text editor, but a good setup gives you completion, jump-to-definition, and inline errors as you type. It takes a few minutes and pays for itself on the first day.
Visual Studio Code
The usual setup pairs two pieces: the Odin Language Server (known as OLS) and the Odin extension for VS Code. The extension talks to the server; the server does the actual analysis of your code.
- Install OLS and put it on your
PATH, following the installation guide on the Odin website. - Install the Odin extension from the VS Code marketplace.
- Turn on format on save. OLS will call the official formatter for you, so your file is always in Odin's one true style.
Other Editors and the Language Server
OLS is an open-source project by Daniel Gavin, and it speaks the standard Language Server Protocol. That means any editor with LSP support — Neovim, Emacs, Sublime Text, Zed, and others — can use the same server. Because editor configuration changes fairly often, follow the current instructions on the Odin website rather than copying an old blog post.
When Something Goes Wrong
Almost every early problem is one of three things. Check them in this order before you start changing your code.
Three Common Problems
- "odin: command not found" (or "is not recognized" on Windows). The terminal cannot find the compiler. Open a brand-new terminal first — old ones keep the old
PATH— and if it still fails, add the Odin folder to yourPATHagain, carefully. - Linker errors on Windows such as "cannot open file cl.exe" or complaints about
link.exe. This means the MSVC build tools are missing or were never selected during installation. Re-run the Visual Studio installer and enable Desktop development with C++. - Strange, unrelated-looking errors about paths. Odin (and LLVM underneath it) dislikes release folders with spaces or very long paths. Move the release to something short like
C:\odinand try again.
Where to Go Next
You now have a working toolchain, a first program, and the six commands that cover day-to-day work. That is genuinely all the setup you need — Odin has no build files to write yet and no dependencies to resolve.
- Keep your
hellopefolder; we will extend it as we go. - Remember the loop: edit,
odin check ., thenodin run .. - If you get stuck on a compiler message, bring it to the next lesson — syntax errors are the subject of our very next topic.
Continue with Statements, Expressions & Comments →